In this article I will share the steps to show the title and meta on hover in the Divi Portfolio module overlay.
By default the title and the categories show at the bottom of the image in the portfolio module. However with just a few lines of code we can move them in to the overlay.
Here is a preview of how it will look at the end.

Lets get started.
Add CSS Class to Divi Portfolio Module
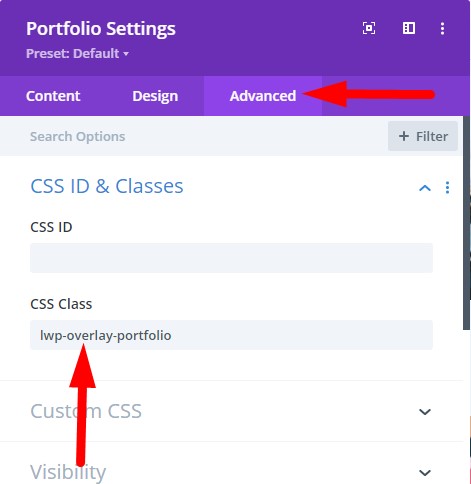
The first step is to add a custom CSS Class to the Portfolio module. We use a custom css class to target our code so that the code does not affect any other content on the website.
Open the Portfolio Module Settings > Advanced > CSS ID & Classes > CSS Class and then add the class lwp-overlay-portfolio. If you are not sure where to add the class then here is a screenshot to help you.

Add jQuery Code to move Title and Meta on Overlay
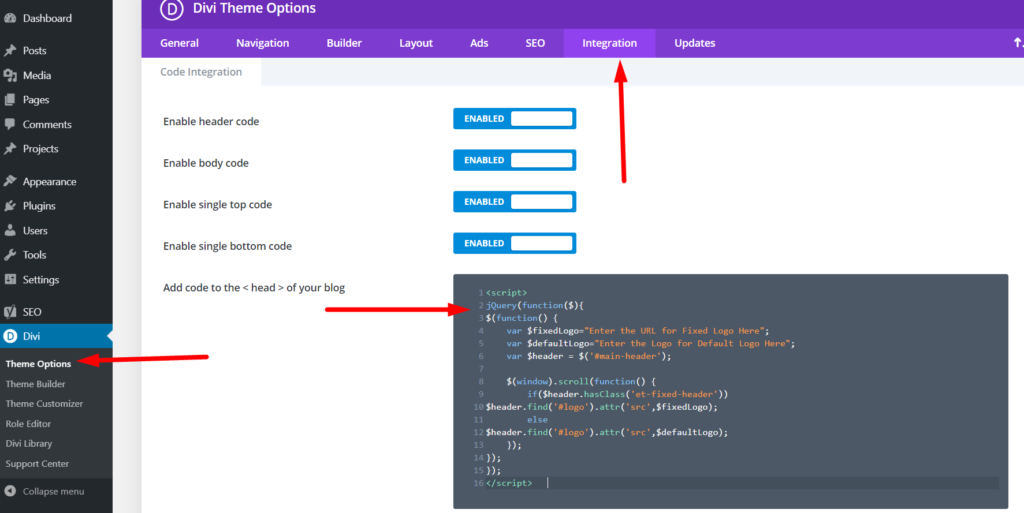
Next go to your WordPress Dashboard > Theme Options > Integration > Add code to the < head > of your blog. And paste the code below there.
<script>
jQuery(function($) {
    $(document).ready(function() {
        $('.lwp-overlay-portfolio .et_pb_portfolio_item').each(function() {
            var header = $(this).find(".et_pb_module_header");
            var meta = $(this).find(".post-meta");
            header.add(meta).wrapAll('<div class="portfolio-wrapper"></div>');
            var wrapper = $(this).find(".portfolio-wrapper");
            var overlay = $(this).find(".et_overlay");
            $(wrapper).appendTo(overlay);
        });
    });
    $(document).ajaxSuccess(function() {
        $('.lwp-overlay-portfolio .et_pb_portfolio_item').each(function() {
            var header = $(this).find(".et_pb_module_header");
            var meta = $(this).find(".post-meta");
            header.add(meta).wrapAll('<div class="portfolio-wrapper"></div>');
            var wrapper = $(this).find(".portfolio-wrapper");
            var overlay = $(this).find(".et_overlay");
            $(wrapper).appendTo(overlay);
        });
    });
});
</script>
Here is a screenshot of where you need to add the code.

This code will move the title and categories on the overlay in the Divi Portfolio module. But the title will be aligned to the top and left edge of the image.
We can use some custom css to vertically center the text on the image and also remove the icon from the overlay.
Add CSS Code to Theme Options
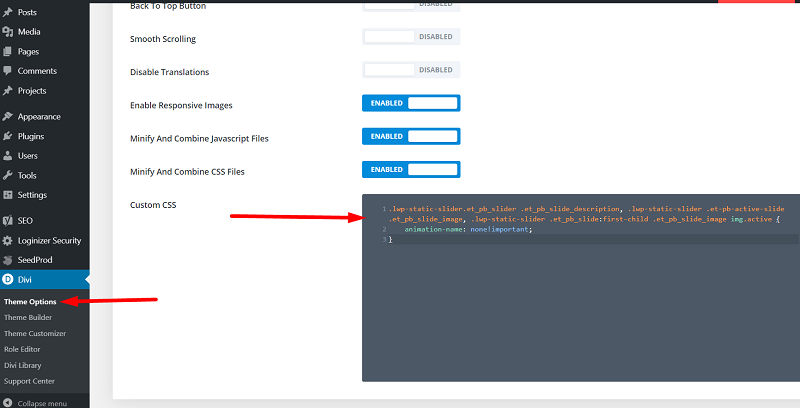
To improve the styles and hide the icon go to your WordPress Dashboard > Divi > Theme Options > Custom CSS and add the following code.
.lwp-overlay-portfolio .portfolio-wrapper {
    position: absolute;
    top: 50%;
    transform: translateY(-50%);
    width: 80%;
    left: 0;
    right: 0;
    margin-left: auto;
    margin-right: auto;
}

.lwp-overlay-portfolio .et_overlay:before {
    display: none;
}
If you are not sure where to add the code then please have a look at the screenshot below.

This code will vertically center the text in the overlay of the portfolio module and hide the overlay icon.
If you want to horizontally center the text or change any other styles then you can do so directly in the Module Settings > Design > Title Text or Meta Text. The color for the Overlay can be adjusted in Design Tab > Overlay toggle in the module settings.
If you want the text to be closer to the edges then you can adjust the width:80% value in the code.
Next you can check another Divi Tutorial
- How to Change Number of Columns in Divi Portfolio Module
- How to Display a Different Logo on Mobile in Divi
Don’t forget to subscribe to the Newsletter to receive the latest tutorials in your inbox. Leave a comment below if you found this helpful or have any questions related to this tutorial.
Thanks, it’s perfect !