In this tutorial I will share the steps to autoplay videos in the Divi video module and hide the controls on the video.
Before we start with the tutorial it is important to know that it is not possible to autoplay videos with sound. Browsers will block the video from loading if you try to play it unmuted. You can learn more about the autoplay policy from Google at this link.
Another thing to note is that the autoplay code will only work on self hosted videos. This will not work for third party video players such as YouTube or Vimeo.
Now lets get started.
1. Add CSS Class To The Video Module
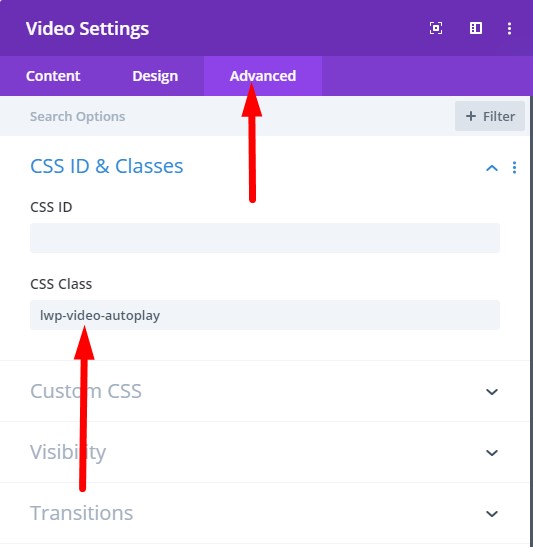
The first thing that you need to do is add a custom CSS Class to the Video module. This is so that the code does not affect all the video modules on your website.
You can add the CSS Class inside the Video Module Settings > Advanced > CSS ID & Classes > CSS Class. For this tutorial we will be adding the class lwp-video-autoplay to it.
Here is a screenshot to help you understand where to add the CSS Class in the video module settings.

2. Add jQuery Code to Autoplay Video in Theme Options
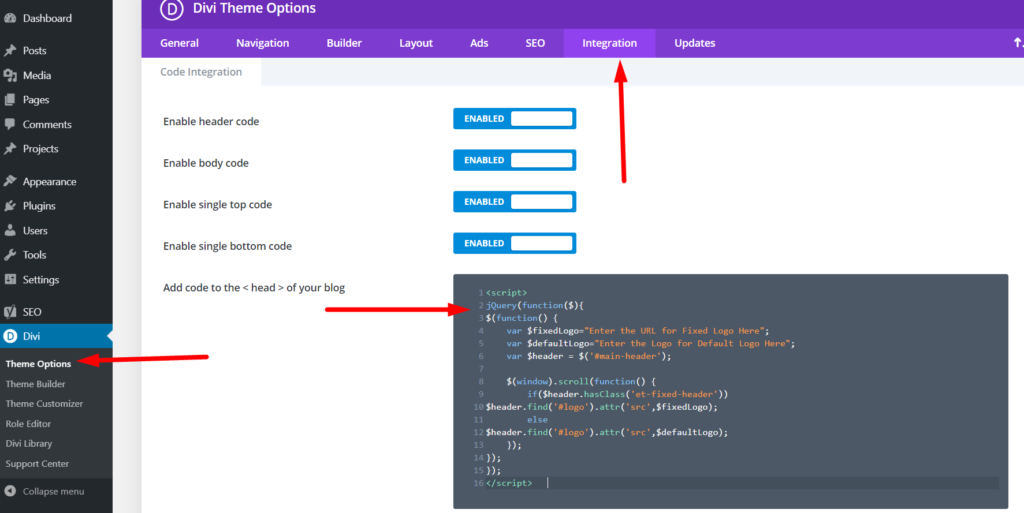
Next you need to add the code below at your WordPress Dashboard > Theme Options > Integration > Add code to the < head > of your blog.
<script>
jQuery(document).ready(function() {
    if (jQuery('.lwp-video-autoplay .et_pb_video_box').length !== 0) {
        jQuery('.lwp-video-autoplay .et_pb_video_box').find('video').prop('muted', true);
        jQuery(".lwp-video-autoplay .et_pb_video_box").find('video').attr('loop', 'loop');
        jQuery(".lwp-video-autoplay .et_pb_video_box").find('video').attr('playsInline', '');

        jQuery(".lwp-video-autoplay .et_pb_video_box").each(function() {
            jQuery(this).find('video').get(0).play();
        });
        jQuery('.lwp-video-autoplay .et_pb_video_box').find('video').removeAttr('controls');
    }
});
</script>
That’s it. Now every video module on your website that has the class lwp-video-autoplay will autoplay the video on your website.
If you are not sure where to add the code then here is a screenshot to help you.

The code above mutes the video, sets it to loop and hide the controls on it. If you want to disable looping of the video then you can delete the line number 5 from the code.
jQuery(".lwp-video-autoplay .et_pb_video_box").find('video').attr('loop', 'loop');
And if you want to show controls on the video then you need to remove the line number 11 from the code.
jQuery('.lwp-video-autoplay .et_pb_video_box').find('video').removeAttr('controls');
Leave a comment below if you found this helpful or have any questions. Don’t forget to subscribe to the Newsletter to receive the latest tutorials in your inbox.
Thank you Thank you Thank you!!!!
It resolves my issue in less than 5 seconds!!!
You are welcome Zachary.
Hey,
Thanks for the great tutorial. Worked perfectly for me.
Is it possible, however, to use this for .webm?
Thanks in advance,
Dimitar
The format of the video should not matter the code should autoplay regardless of the format.
Hi
Excellent.
But if I use the right Mousetab I can download the video anyway!
Is there a possibillity to block the right mouse tab?
I have tried the video slider script and it works well. Now I would like to play the next slider video after the first one. Thanks. I’m a new fan of yours
Hi! I followed your instructions exactly, but the video doesn’t autoplay on my site at all. I have to click on the button for it to play.
Could you share a link to your website?
Here is the link to my site:
https://thetaxfreeman.com/
Try removing the overlay on the video. There is no need for the image overlay since the video is going to autoplay on its own.