In this tutorial I will share the steps to autoplay videos in the Divi video module and hide the controls on the video.
Before we start with the tutorial it is important to know that it is not possible to autoplay videos with sound. Browsers will block the video from loading if you try to play it unmuted. You can learn more about the autoplay policy from Google at this link.
Another thing to note is that the autoplay code will only work on self hosted videos. This will not work for third party video players such as YouTube or Vimeo.
Now lets get started.
1. Add CSS Class To The Video Module
The first thing that you need to do is add a custom CSS Class to the Video module. This is so that the code does not affect all the video modules on your website.
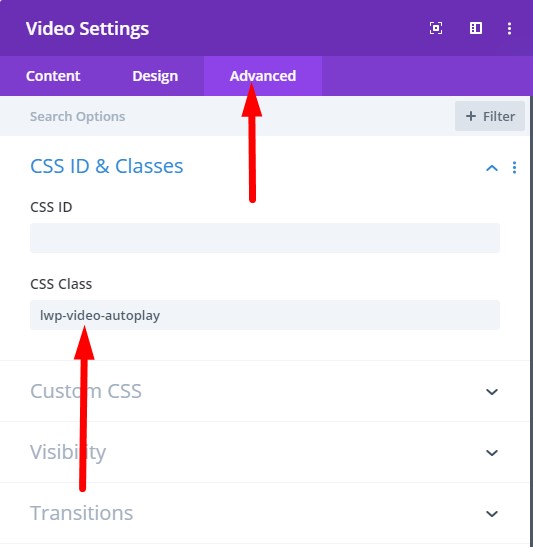
You can add the CSS Class inside the Video Module Settings > Advanced > CSS ID & Classes > CSS Class. For this tutorial we will be adding the class lwp-video-autoplay to it.
Here is a screenshot to help you understand where to add the CSS Class in the video module settings.

2. Add jQuery Code to Autoplay Video in Theme Options
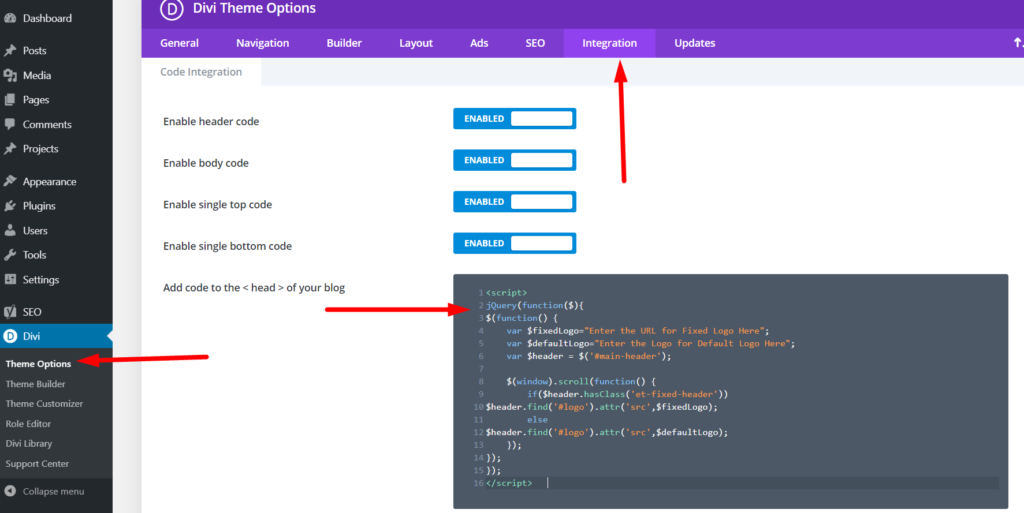
Next you need to add the code below at your WordPress Dashboard > Theme Options > Integration > Add code to the < head > of your blog.
<script>
jQuery(document).ready(function() {
    if (jQuery('.lwp-video-autoplay .et_pb_video_box').length !== 0) {
        jQuery('.lwp-video-autoplay .et_pb_video_box').find('video').prop('muted', true);
        jQuery(".lwp-video-autoplay .et_pb_video_box").find('video').attr('loop', 'loop');
        jQuery(".lwp-video-autoplay .et_pb_video_box").find('video').attr('playsInline', '');

        jQuery(".lwp-video-autoplay .et_pb_video_box").each(function() {
            jQuery(this).find('video').get(0).play();
        });
        jQuery('.lwp-video-autoplay .et_pb_video_box').find('video').removeAttr('controls');
    }
});
</script>
That’s it. Now every video module on your website that has the class lwp-video-autoplay will autoplay the video on your website.
If you are not sure where to add the code then here is a screenshot to help you.

The code above mutes the video, sets it to loop and hide the controls on it. If you want to disable looping of the video then you can delete the line number 5 from the code.
jQuery(".lwp-video-autoplay .et_pb_video_box").find('video').attr('loop', 'loop');
And if you want to show controls on the video then you need to remove the line number 11 from the code.
jQuery('.lwp-video-autoplay .et_pb_video_box').find('video').removeAttr('controls');
Leave a comment below if you found this helpful or have any questions. Don’t forget to subscribe to the Newsletter to receive the latest tutorials in your inbox.
Thank you very much for this!
I’m a fan now and will follow you. 🙂
You are welcome.
its worked but what if video has sound ? the video is playing mute
It is not possible to autoplay a video with sound. Browsers will block the video from loading. You can learn more about browser autoplay policy on this link from Google.
https://developers.google.com/web/updates/2017/09/autoplay-policy-changes
Works perfect in 1 try, took me 1 min to fix!
Thanks for the clear description!
You are welcome Kim.
It works great for me! Just a question, the video on my website does not play on the iPhone, and I think it may be due to the video format (.webm). Is there a code to tell it that if the browser can’t play .webm then to play .mp4?
Thank u so muuuuuuch!
When you upload a video please make sure that you upload both webm and mp4 versions. The video module has options to upload both. Also please check if the video still works without the code. If it works without code then it could be an issue with power save mode or low battery on your phone that might be stopping the video from autoplaying. Some one else had the same issue in the comments and they had power save mode enabled.
Did not work for me. All the script did was resize our video a bit smaller. Perhaps it’s the other Java on our site? https://www.tobinscientific.com/facility/
I only see a YouTube video on your website. As mentioned in the article this code only works for videos hosted on your website.